


This X leg dining table plan is the table version of the $20 X leg bench plan I designed and built for my front porch. Build this table and two benches and you’re set for a new dining room setup! This table is an easy build and requires only a few tools: a drill/driver for fastening and a miter saw for cutting.
X leg Dining Table

Materials
- four – 28″ long 2×4
- four – 25″ long 2×4
- four – 36″ long 2×4
- 60″ long 2x material to equal about 36″ wide when combined.
Legs
Use wood glue and 2 1/2 – 3″ wood screws to attach the 28″ top and bottom leg pieces to the 25″ sides.

- Use assembly squares or corner clamps to ensure your legs are square during assembly.
- Make sure to sink the screws into the wood on the bottom pieces so they never come into contact with and scratch your floor when the table is in use.

Cut angles and notches in X pieces
- The legs are exact squares making the angles easy 45•.
- Make sure to get the exact inside diagonal measurement of your table leg so your X pieces are the exact right length.
- Then mark the center and make 45• cuts on both sides and both ends of each piece. (As shown below.)

Once you have the angles on the X pieces cut, insert them into the box (they’ll only fit halfway in at this point) and mark where they cross. Mark one side then flip the entire leg over and mark the other side.

Cut halfway through each of the boards where you just marked. This creates a half lap joint.

To cut out the notches, use your miter saw and make a series of cuts about 1/8″ apart from each other — just to the halfway mark on each board. Then break out the wood that is left. Then the two boards should fit together.

Glue the X pieces together and insert into your legs. Secure with glue an brad nails.

Tabletop
Use wood glue and clamps to build your tabletop out of a combination of 2x material that you find visually appealing. I find it’s easiest to glue two boards together and after the glue sets on those two, glue another onto one end. That way you only have one joint to worry about aligning at one time.
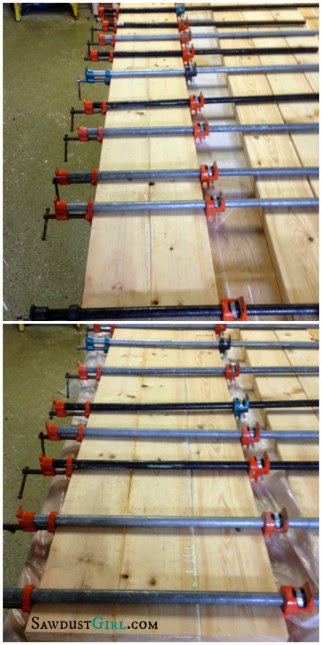
If you find some boards that have a pretty grain pattern but don’t create the width you want, don’t be afraid to glue wider than you need and then trim to size. A circular saw or track saw work great for this task.

Attach legs to tabletop
- Make sure to allow for wood movement when attaching your tabletop.
- Use Dowels or loose tenons here OR
- Attach with wood screws and washers. Drill a hole in the leg that will allow the wood screw to move from side to side a bit, use a washer to keep the screw from pulling through.
Sand, finish and Enjoy!

No comments:
Post a Comment